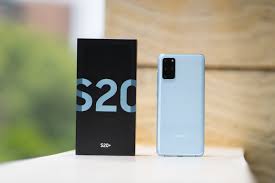
To turn on your Samsung S20, locate the power button on the right side below the volume keys. Press and hold the power button until you see the Samsung logo. This confirms the device is booting up properly. Once it’s on, you’ll follow the guided setup to configure your phone, connect to Wi-Fi, and customize your preferences. Sign in to your Google account to access all your apps and data. You can also adjust settings like sounds, display, and security to make your phone truly yours. Explore further to get the most out of your Samsung S20 experience.
Locate the Power Button
The power button on your Samsung S20 is located on the right side of the device, just beneath the volume keys. This strategic placement makes it easy to access with your thumb or index finger, whether you’re right-handed or left-handed. You’ll find it just below the two volume buttons, making it easy to distinguish by touch.
To locate the power button, hold your phone in one hand and run your thumb or index finger along the right edge. The first set of buttons you’ll encounter are the volume up and volume down keys. Just below these, you’ll feel a slightly smaller button. This is your power button. It’s designed to be easily accessible yet distinct from the volume controls to prevent accidental presses.
Understanding where the power button is situated is crucial for efficiently operating your device. Whether you’re turning it on, rebooting, or performing other functions, knowing the exact position of this button will save you time and effort. Familiarizing yourself with its location ensures that you can quickly and confidently power your device on whenever needed.
Press and Hold the Power Button
Pressing and holding the power button is the next step to turn on your Samsung S20. Once you’ve located the power button on the right side of your phone, press it firmly and hold it down. You’ll need to keep pressing for a few seconds to initiate the startup process. This action sends a signal to your device to boot up, starting all necessary systems and preparing the phone for use.
Here’s a quick visual breakdown to help you:
| Step | Action | Duration |
|---|---|---|
| 1 | Locate power button | Instant |
| 2 | Press power button | 1 second |
| 3 | Hold power button | 3-5 seconds |
| 4 | Wait for response | Few seconds |
| 5 | Release button | Instant |
Make sure to press the button with a steady hand. A quick tap won’t do the trick; holding it down is essential. If done correctly, you should feel a slight vibration, and your screen will start to light up. This indicates that your Samsung S20 is beginning to power up. By following these steps, you ensure that the phone’s hardware and software initiate correctly, setting the stage for the device to become fully operational.
Wait for the Samsung Logo
Once you’ve released the power button, wait patiently for the Samsung logo to appear on the screen. This logo indicates that your Samsung S20 is starting up correctly. Sometimes it can take a few seconds, so don’t worry if it doesn’t show up immediately. During this brief period, your phone is initializing its system, and getting ready to operate smoothly.
While you’re waiting, make sure not to press any other buttons. Interrupting this process could cause delays or require you to restart the power-on sequence. The appearance of the Samsung logo is a reassuring sign that your device is functioning as expected.
You might also notice a quick vibration or a brief flash of light on the screen before the logo appears. These are normal startup indicators. If the Samsung logo doesn’t show up after a minute, you might need to check if your device has enough battery power. Connect it to a charger for a few minutes, then try powering it on again.
Seeing the Samsung logo is your confirmation that the device is booting up properly. Once the logo disappears, your phone will proceed to the next steps in the startup process.
Set Up Your Device
After seeing the Samsung logo, you’ll be guided through a series of setup screens to configure your Samsung S20. First, you’ll select your preferred language from the list. Once you’ve chosen, tap ‘Next’ to proceed. You’ll then be prompted to agree to the terms and conditions, including Samsung’s Privacy Policy. Make sure to read through them and tap ‘Agree’ to continue.
Next, you’ll set up your device’s security. You can choose from several options like PIN, pattern, or password. For additional security, you can also enable facial recognition or fingerprint scanning. Follow the on-screen instructions to configure your chosen method.
After setting up security, you’ll have the chance to restore data from an old device or start fresh. If you choose to restore, you’ll need a backup from a previous device or cloud service. Follow the prompts to complete the restoration.
The next steps involve basic customization. You’ll set the date and time, and you can also adjust other settings like font size and display preferences. Once you’ve completed these steps, your Samsung S20 will be ready for use, customized to your liking.
Connect to Wi-Fi
To connect your Samsung S20 to Wi-Fi, start by swiping down from the top of the screen to open the Quick Settings panel. Look for the Wi-Fi icon; it looks like a small radar signal. Tap this icon to enable Wi-Fi if it’s not already on. Once enabled, press and hold the Wi-Fi icon to open the Wi-Fi settings menu.
In the Wi-Fi settings menu, your S20 will automatically scan and display available networks. Find your network from the list and tap on it. If your network is secured, you’ll be prompted to enter the password. Carefully type in the password and then tap “Connect.”
After a moment, you should see a “Connected” status under your network name, indicating that your Samsung S20 is now connected to Wi-Fi. You can now enjoy browsing the internet, downloading apps, and more without using mobile data.
If you encounter any issues, double-check the password and ensure your router is functioning properly. Sometimes, a simple restart of your device or router can resolve connectivity issues.
You’re now ready to move on to the next steps in setting up your Samsung S20.
Sign In to your Google Account
With your Samsung S20 connected to Wi-Fi, the next step is signing in to your Google account to access essential services and apps. Start by locating the Google icon on your home screen or app drawer. Tap it, and you’ll be prompted to enter your email address and password. If you don’t have a Google account, you can create one by selecting the ‘Create Account’ option and following the on-screen instructions.
After entering your credentials, tap ‘Next’. Google will then verify your details. You might be asked to accept the terms of service and privacy policy, so read through them and press ‘I Agree’. Two-factor authentication (2FA) may be required; if you’ve set it up, enter the verification code sent to your device.
Once signed in, your Samsung S20 will sync to your Google account. This includes your contacts, calendar events, emails, and any apps you’ve previously downloaded. You’ll see a confirmation message once the synchronization is complete.
Your Google account is now linked, giving you full access to the Google Play Store and other Google services. This ensures you can download apps, back up data, and enjoy a seamless Android experience.
Customize Settings
Now that you’re signed in, let’s dive into customizing your Samsung S20 to fit your personal preferences. Start by pulling down the notification shade from the top of the screen and tapping the gear icon to access the Settings menu.
First, adjust your display settings. Go to ‘Display’ and tweak brightness, screen timeout, and enable features like Dark Mode or Blue Light Filter. If you want a more vibrant screen, switch to ‘Vivid’ under Screen Mode.
Next, personalize your home screen. Long-press on an empty space to bring up customization options. You can add widgets, change wallpapers, and rearrange app icons to your liking.
Then, set up your security preferences. Navigate to ‘Biometrics and Security’ to add fingerprints, facial recognition, or set up a secure lock screen pattern or PIN.
Don’t forget to configure your notifications. Head to ‘Notifications’ and decide which apps can alert you and how. You can choose between sound, vibration, or silent notifications.
Lastly, customize your sound settings under ‘Sounds and Vibration.’ Change ringtones, notification sounds, and even vibration patterns to ensure your phone feels just right for you.
Video Guide
Frequently Asked Questions
How Do I Perform a Soft Reset on the Samsung S20?
To perform a soft reset on the Samsung S20, press and hold the Volume Down and Power buttons simultaneously for about 10 seconds. Your device will restart, resolving minor software issues without losing your data.
What Should I Do if the Samsung S20 Doesn’t Turn On?
If your Samsung S20 doesn’t turn on, try charging it for at least 30 minutes. Then, press and hold the power and volume down buttons simultaneously for about 10 seconds to perform a soft reset.
How Can I Access Recovery Mode on the Samsung S20?
To access recovery mode on your Samsung S20, press and hold the Volume Up and Power buttons simultaneously until the Samsung logo appears. Release the buttons, and you’ll enter the recovery mode menu.
Can I Turn on the Samsung S20 Without the Power Button?
Yes, you can turn on the Samsung S20 without the power button. Just plug it into a charger or a computer. The phone will automatically power up once it detects a charging source.
How Do I Enable Safe Mode on the Samsung S20?
To enable Safe Mode on your Samsung S20, press and hold the Power button, then tap and hold “Power Off” until “Safe Mode” appears. Tap “Safe Mode” to restart your phone in Safe Mode.
Conclusion
You’ve now successfully turned on your Samsung S20 and completed the initial setup. Connecting to Wi-Fi and signing into your Google account ensures you’re ready to go.
Customize your settings to make the device truly yours. Enjoy exploring all the features and apps available to you.
With just a few steps, you’re all set to make the most of your new phone. Happy exploring and enjoy your Samsung S20!


