When your Samsung dryer flashes an ‘HE’ code, it means there’s a heating error you need to fix. Start by checking the power supply and inspecting the dryer vent for obstructions. Make sure the thermostat and heating element are working using a multimeter. Also, look at the thermal fuse and replace it if it’s blown. Confirm the moisture sensor isn’t malfunctioning. Inspect each component carefully to identify the issue. If everything checks out, try performing a reset. Stay tuned for detailed steps on each troubleshooting method.
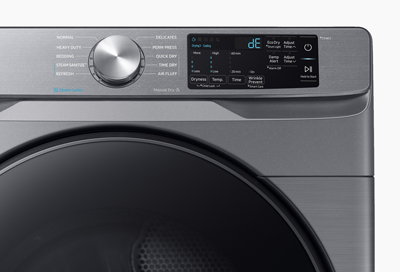
Understand the hE Code
The hE code on your Samsung dryer indicates a heating error that needs immediate attention. When this code appears, it means your dryer isn’t heating properly, which can disrupt your laundry routine and possibly point to bigger issues. Understanding what causes the hE code is essential to getting your dryer back in working order.
First, check your dryer’s power supply. An inadequate power supply can cause heating problems. Ensure the dryer is plugged into a functioning outlet and that your home’s circuit breakers aren’t tripped.
Next, consider the dryer’s internal heating components. The heating element, thermostat, or thermal fuse could be faulty. These parts can wear out over time and prevent your dryer from generating heat.
Additionally, examine the moisture sensor. Your Samsung dryer uses this sensor to determine when clothes are dry. If it’s malfunctioning, the dryer mightn’t heat correctly.
Check the Dryer Vent
Regularly inspect the dryer vent to ensure it’s not obstructed and allowing proper airflow. A blocked vent can cause your Samsung dryer to display the hE code due to restricted airflow, which makes it harder for the dryer to function efficiently. Start by unplugging your dryer and pulling it away from the wall to gain access to the vent.
Check the vent hose for any visible lint buildup or obstructions. Disconnect the hose from both the dryer and the wall, and use a vacuum or a vent cleaning brush to remove any lint inside. Make sure the vent hose is free of kinks or damage, as these can also impede airflow.
Next, go outside to where the vent exits your home. Ensure the external vent cover opens freely and isn’t clogged with debris. Clear away any blockages you find. You can use a flashlight to look inside the vent and verify it’s clear.
Once everything is clean and clear, reconnect the vent hose and push the dryer back into place. Plug it back in and run a test cycle to see if the hE code is resolved.
Keeping the vent clean ensures your dryer operates efficiently and safely.
Inspect the Thermostat
Before diving into more complex issues, inspect the thermostat to ensure it’s functioning correctly. The thermostat regulates the temperature inside your dryer and can cause the hE code if it’s malfunctioning.
Start by unplugging your dryer to ensure safety. Next, locate the thermostat, typically found on the back panel or near the heating element. Once you’ve found it, carefully remove it using a screwdriver. Check for any visible damage or signs of wear. Sometimes, a faulty thermostat may have burn marks or other obvious defects.
If you don’t see any visible damage, you’ll need a multimeter to test its functionality. Set your multimeter to the lowest ohms setting and place the probes on the thermostat terminals. A reading of zero or close to zero indicates that the thermostat is working. If the reading is significantly higher, the thermostat is likely faulty and needs replacing.
Reinstall the thermostat if it’s in good condition, or replace it with a new one if necessary. Once you’ve addressed the thermostat, you can move on to other potential causes of the hE code. This step eliminates one common issue and brings you closer to fixing your Samsung dryer.
Test the Heating Element
To ensure your dryer heats properly, start by testing the heating element for any faults. First, unplug your dryer to avoid any electrical hazards. Next, locate the heating element, typically found near the back of the dryer. You’ll need to remove the back panel to access it, so have a screwdriver handy.
Once you’ve exposed the heating element, visually inspect it for any obvious signs of damage like breaks or burns. If it looks intact, you’ll need a multimeter to check its functionality. Set your multimeter to the lowest resistance setting and touch the probes to the heating element terminals. A good heating element should show a reading between 10 and 50 ohms. If you get a reading outside this range or no reading at all, the heating element is faulty and needs replacing.
Reinstall the back panel once you’re done. If the heating element checks out but you’re still getting the hE code, it’s time to investigate other components in the dryer.
Examine the Thermal Fuse
Next, check the thermal fuse to ensure it’s not causing the hE code error. First, unplug your dryer to avoid any electrical hazards.
Locate the thermal fuse; it’s usually found on the blower housing or near the heating element. Refer to your user manual if you’re unsure.
Once you’ve found the thermal fuse, carefully remove it from its position. You can use a multimeter to test for continuity. Set the multimeter to the lowest ohms setting, then place the probes on the fuse terminals. If the multimeter shows a reading of zero or close to zero, the fuse is still functional. However, if there’s no change in the reading, the fuse is blown and needs replacement.
Replacing the thermal fuse is straightforward. Purchase a compatible fuse from a reliable supplier, then install it by attaching it to the same connectors and securing it in place. Make sure everything is snug and properly connected before you reassemble the dryer.
After replacing the thermal fuse, plug the dryer back in and run a test cycle. If the hE code no longer appears, you’ve likely solved the problem. If the code persists, further investigation is necessary.
Verify the Control Board
If replacing the thermal fuse didn’t resolve the issue, it’s time to verify the control board for potential problems. The control board, or main PCB, is the brain of your dryer. It manages various functions, including temperature regulation and cycle settings. A malfunctioning control board can trigger the hE code, indicating a heating error.
First, unplug your dryer to ensure safety. Remove the top panel by unscrewing the screws at the back. Locate the control board, usually housed in a plastic casing near the top. Carefully inspect it for visible signs of damage such as burnt components, loose connections, or corrosion.
Next, use a multimeter to check the continuity of the control board. Place the multimeter probes on the terminals of the board to ensure it’s receiving power and sending signals correctly. If any readings appear inconsistent, the control board may be faulty.
Sometimes, a simple visual inspection won’t reveal issues. In such cases, consider consulting the user manual or contacting a professional for a detailed diagnostic. Replacing the control board can be complex and might require expert assistance.
If everything looks fine, but the issue persists, it might be time to explore other solutions.
Perform a Reset
Sometimes, performing a reset can resolve the hE code issue by rebooting the system and clearing any temporary glitches. To start, unplug your Samsung dryer from the power outlet. Wait for at least five minutes to ensure that the electrical charge dissipates completely. This step is crucial because it allows the internal components to reset properly.
Next, plug the dryer back in. Turn it on and see if the hE code has disappeared. If the code is gone, run a test cycle to ensure the dryer operates correctly. While this simple method often works, it’s not always a guaranteed fix for all underlying issues.
If the hE code reappears after resetting, don’t worry. It’s possible that there are more significant issues at play, such as a malfunctioning heating element or a problem with the thermostat. In such cases, additional troubleshooting or professional help might be necessary.
Performing a reset is a quick and easy first step that can save you time and effort. Always start with this method before moving on to more complex solutions. If the problem persists, you’ll know it’s time to dig deeper or call in a professional.
Frequently Asked Questions
How Often Should I Clean the Lint Filter?
You should clean the lint filter after every dryer cycle. It helps maintain efficient drying, reduces fire risks, and prolongs the dryer’s lifespan. Don’t forget to check and clean the filter regularly for optimal performance.
Can Using Incorrect Settings Cause the hE Code?
Yes, using incorrect settings can cause the hE code. Ensure you select the right cycle for the load type. If the settings don’t match the load, the dryer might overheat or fail to function properly.
Is It Safe to Continue Using the Dryer With an hE Code?
You shouldn’t continue using the dryer with an hE code. It indicates a heating problem that could lead to further damage. Address the issue immediately to avoid potential safety hazards and costly repairs.
What Are the Signs of a Failing Heating Element?
You’ll notice clothes taking longer to dry, the dryer not heating properly, or it shutting off mid-cycle. These signs suggest the heating element might be failing and you should consider replacing it soon.
Can Power Surges Affect the Dryer’s Performance?
Yes, power surges can affect your dryer’s performance. They can damage the electronic control board, leading to errors or malfunction. To prevent this, consider using a surge protector to safeguard your appliance.
Conclusion
You’ve now got a comprehensive guide to tackle the Samsung dryer hE code.
Start by understanding the code itself, then check the dryer vent, inspect the thermostat, and test the heating element.
Don’t forget to examine the thermal fuse and verify the control board.
If all else fails, perform a reset.
With these steps, you should be well-equipped to fix the issue and get your dryer back in working order.